


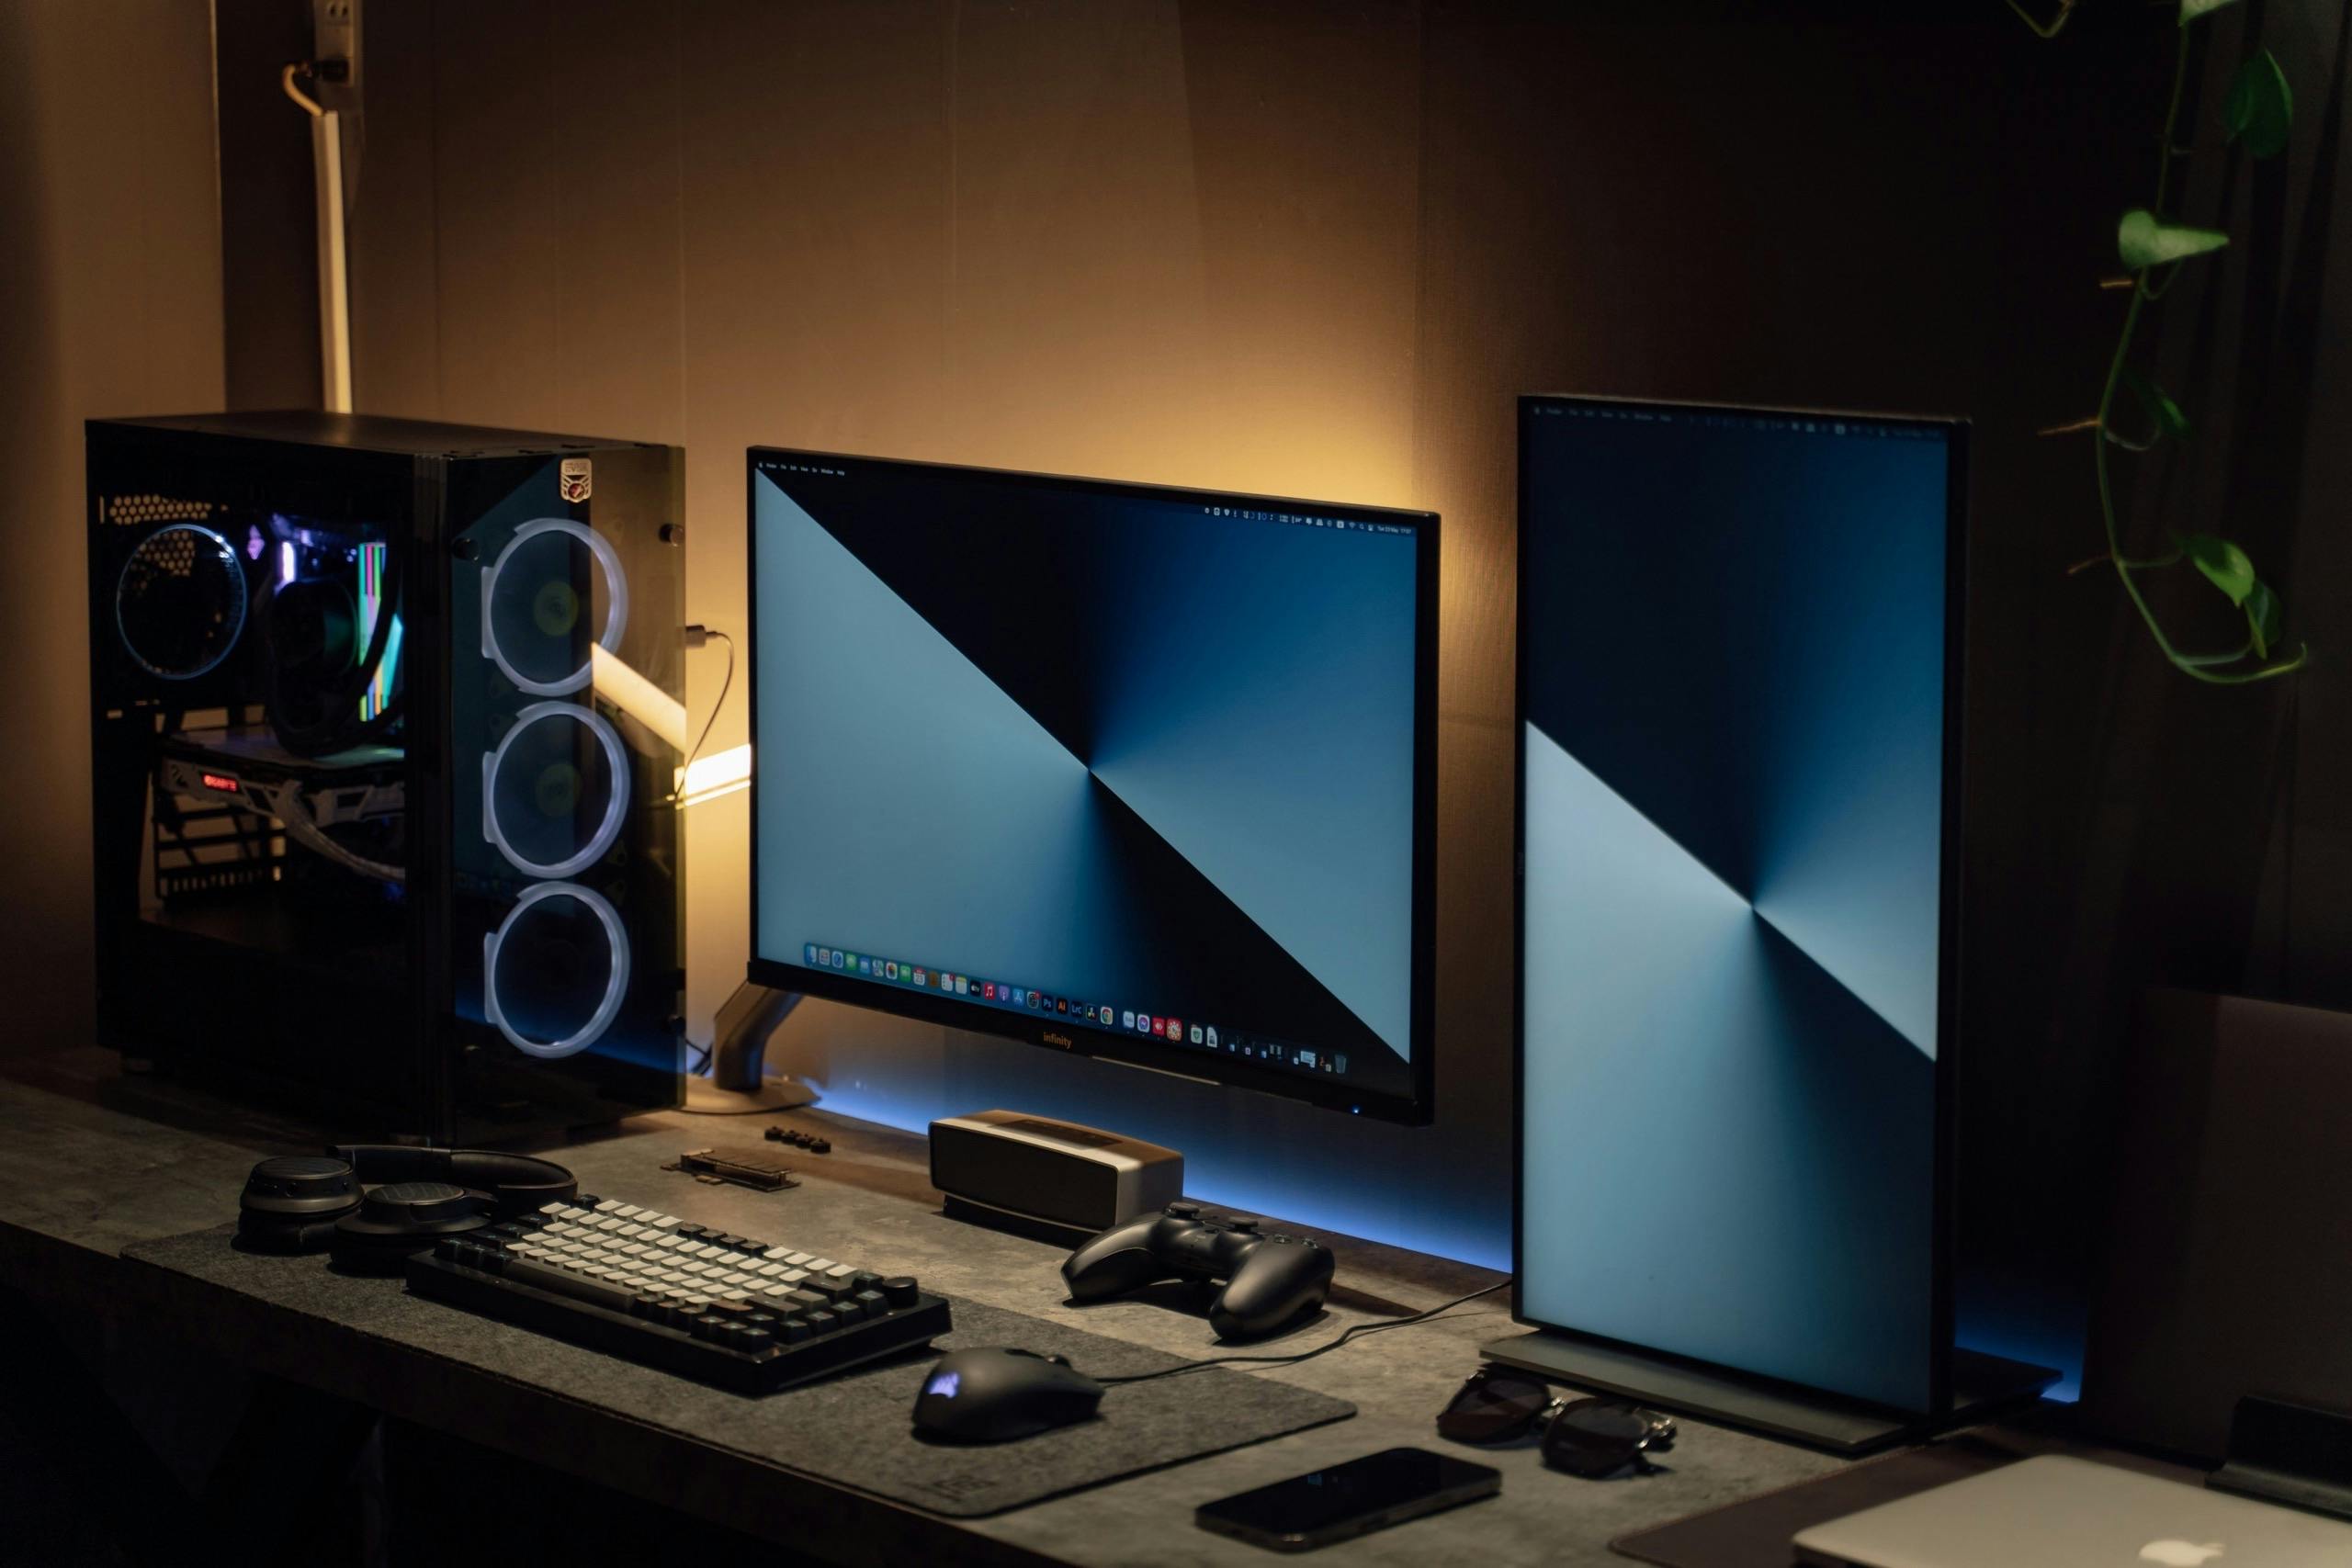
The digital age has transformed workspaces, making it possible for people to optimize their setups for both productivity and entertainment. A vertical monitor setup, especially with dual curved monitors, is often considered one of the best multi monitor setup thanks to the unique advantages it offers over traditional layouts. This article explores its benefits, best practices, and how it maximizes screen space.
What is a Vertical Monitor Setup?
A vertical monitor setup involves positioning a monitor in portrait orientation (rotated 90 degrees) instead of the standard landscape mode (default horizontal position). This configuration is beneficial for tasks requiring more vertical space, such as coding, document editing, and browsing long-form content.

Modern monitors support vertical rotation via adjustable stands or VESA mounts. They keep their native resolution but switch the aspect ratio (e.g., 1080 × 1920). This setup boosts productivity by displaying more vertical content but may need ergonomic tweaks and cable management.
Why Choose a Vertical Monitor Setup?
The monitor setups have gained popularity for several compelling reasons. By orienting one or both screens in portrait mode, you can gain several benefit, such as:
- Enhanced Productivity: With more vertical screen real estate, you can view more content without scrolling. This is particularly useful for coders and writers who work with lengthy documents or codebases.
- Improved Ergonomics: Adjusting your monitor to eye level in portrait mode can reduce neck strain and promote better posture.
- Optimized Reading Experience: Vertical screens mimic the natural flow of text, making it easier to read PDFs, eBooks, and web pages.
- Better Multitasking: Combine a vertical monitor with a horizontal one for a dual-screen setup, ideal for managing different types of content simultaneously.
If you're interested in optimizing dual-screen setup layout, check out our complete guide to creating the best dual monitor setup for more detailed tips.
How to Set Up a Vertical Monitor
It comes as no surprise that a setting up monitors vertically can dramatically improve your workflow. Here is the entire process of setting up a vertical monitor, from selecting the right hardware to optimizing your workspace.
Step 1. Choose the Right Monitor for a Vertical Setup
When selecting a monitor for vertical orientation, certain specifications become particularly important:
| Specification | Recommended | Use for |
| Rotatable Stand | Built-in pivot feature with 90° rotation | Easiest setup without additional hardware |
| VESA Compatibility | 75x75mm or 100x100mm | Necessary if using third-party mounts |
| Screen Size | 24-27 inches | Balance visibility and ergonomics |
| Aspect Ratio | 16:9 or 16:10 | Common ratios that work well in portrait mode |
| Resolution | 1440p or higher | Maintain clarity across the vertical span |
| Panel Type | IPS or VA | Offer better viewing angles for vertical orientation |
| Response Time | 5ms or lower | Important for smooth scrolling and video |
| Connectivity | DisplayPort 1.4, HDMI 2.0+ | Ensure compatibility with modern graphics cards |
Step 2. Mount the Monitor
There are two primary ways to position your monitor vertically:
Using the Monitor's Built-in Pivot Feature if your monitor includes a rotatable stand:
- Ensure your desk surface is clear and stable.
- Gently rotate the monitor 90 degrees clockwise or counterclockwise.
- Most stands will click into place when properly positioned.
- Adjust the height and tilt for optimal viewing
>> Read more: Best Desk Shelf for Monitor: Instantly Upgrade Your Workspace Setup
Using a VESA-Compatible Mount if your monitor doesn't pivot or you prefer a different mounting solution:
- Confirm your monitor's VESA pattern (typically 75x75mm or 100x100mm)
- Purchase a high-quality and compatible desk mount, wall mount, monitor stand or monitor arm
- Attach the mount to your desk or wall following manufacturer instructions
- Secure the monitor to the mount using the provided hardware
- Rotate the monitor to portrait orientation and tighten all adjustments

Step 3. Connect Your Monitor
- Use the appropriate cable (HDMI, DisplayPort, USB-C, etc.) based on your monitor and computer specifications
- For optimal performance, prioritize DisplayPort for higher refresh rates and resolution
- Route cables neatly to avoid strain when rotating or adjusting the monitor
Step 4. Adjust Display Settings
Once physically set up, you'll need to adjust your operating system settings.
For Windows:
- Right-click on your desktop and select "Display Settings"
- Identify your vertical monitor in the display layout
- Scroll down to "Scale and layout" section
- Under "Display orientation," select "Portrait" or "Portrait (flipped)"
- Click "Apply" and confirm the changes
- Adjust scaling if text appears too small (125-150% recommended)
For macOS:
- Click the Apple menu and select "System Preferences"
- Click on "Displays"
- Select the "Arrangement" tab
- Hold the Option key and click on the monitor you want to rotate
- Select "90°", "180°", or "270°" from the rotation options
- Adjust the arrangement of monitors by dragging them to match your physical setup
Step 5. Set up Optimal Positioning and Ergonomics
Proper ergonomics are especially important with vertical monitors:
- Position the monitor at arm's length (about 20-30 inches from your eyes)
- Align the top third of the screen with your eye level when sitting upright
- Tilt the monitor slightly (5-10 degrees) to reduce neck strain
- Adjust brightness and contrast to match your environment (lower in dim rooms)
- Consider using a blue light filter for extended work sessions
Vertical Monitor Setup Ideas
Different vertical configurations serve various purposes:
| Setup Type | Description | Best For | Advantages | Disadvantages |
| Single Monitor Setup | One monitor in portrait mode | Coding, writing, and reading long documents | Save desk space and be ideal for vertical content | Limited multitasking and not suitable for media-heavy tasks |
| Dual Monitor Setup | Two monitors in portrait mode side by side | Data analysis, research, and code comparison | Expand screen real estate and boost productivity | Require more desk space and sturdy mounts |
| Stacked Monitors Setup | Two monitors stacked vertically | Financial trading, real-time monitoring | Save horizontal space and display continuous data | Require special mounts, can cause neck strain if not ergonomic |
| Mixed Vertical & Horizontal Setup | One monitor in portrait, one in landscape | Multitasking across different applications | Be flexible for diverse tasks and support various workflows | More complex to set up and require additional space |
| Triple Monitor Setup | One vertical monitor with two horizontal ones | Content creation, streaming, advanced tasks | Maximum screen space and be ideal for heavy workloads | Require significant desk space and complex configuration |
| Curved Vertical Monitor Setup | Single or dual curved monitors in portrait | Long-form reading, immersive coding, social medi | Reduce eye strain and provide consistent viewing distances | Expensive and limited compatibility with some tasks |
| Customized Mount Setup | Multiple monitors in mixed orientation | Specialized workstations (e.g., engineering) | Highly customizable and easily-tailored to specific needs | Complicated installation and require advanced hardware support |


Learn how to set up stacked monitors for a home office to fully utilize vertical space.


If you're building a triple monitor setup for gaming and productivity, check out our Gaming Setup Ultimate Guide.

Explore more examples in our dual curved monitor setup guide.

Troubleshooting and Common Challenges with Vertical Monitor Setup
Setting up a vertical monitor can come with its own set of challenges. Here's a comprehensive guide to troubleshooting common issues with vertical monitor setup.
Limited Viewing Angles
Vertical monitors can present limited viewing angles, particularly with certain panel types like TN (Twisted Nematic). This can cause color distortion and reduce image clarity when viewed from the sides.
Technical Details:
- TN panels typically offer 160°/170° viewing angles, while IPS panels provide up to 178°.
- VA (Vertical Alignment) panels offer improved contrast ratios but still have narrower vertical viewing angles compared to IPS.
Solution:
Choose IPS (In-Plane Switching) panels for better color accuracy and wider viewing angles. Adjust the monitor height and tilt to achieve a comfortable and clear viewing position. Consider factory-calibrated monitors for color-critical tasks.
Cable Management Challenges
Rotating a monitor to a vertical position may cause issues with cable length and positioning, leading to strain or clutter.
Technical Details:
- HDMI and DisplayPort cables can be affected by bend radius limitations, causing signal degradation.
- USB-C monitors require cable routing that accommodates power delivery (PD) and data transfer.
Solution:
Use longer cables or right-angle connectors to reduce strain. Invest in cable organizers and monitor arms designed for vertical positioning. Ensure high-speed cables for 4K vertical displays.
Eye Strain and Ergonomics
A vertical monitor setup can cause eye strain if not positioned correctly. Users may need to tilt their heads more frequently, leading to neck and shoulder discomfort.
Technical Details:
- ANSI/HFES 100-2007 standards recommend that the top of the monitor be at or just below eye level.
- Blue light emission from LED-backlit monitors can contribute to digital eye strain.
Solution:
Position the monitor slightly below eye level. Follow the 20-20-20 rule to reduce eye fatigue. Use ergonomic stands and blue light filters for added comfort.
Resolution and Scaling Issues
Text and images may appear distorted or improperly scaled on a vertical monitor. This is especially common with older applications and operating systems that do not support high-resolution vertical displays.
Technical Details:
- DPI (dots per inch) scaling can affect the clarity of UI elements on high-resolution monitors.
- Windows and macOS offer custom scaling options, but not all software respects these settings.
Solution:
Adjust display settings for optimal resolution and scaling. Use high-resolution monitors (1440p or 4K) for clearer visuals. Test and calibrate the display regularly for the best experience. In Windows, access "Display Settings" to configure custom scaling, and on macOS, use "Displays" in System Preferences.
Workspace Constraints
A vertical monitor can occupy more vertical space, which may not fit well in setups with shelves or limited height clearance. This can also reduce accessibility to other desk items.
Technical Details:
- Monitor arm VESA standards (e.g., 75x75mm, 100x100mm) determine compatibility with adjustable mounts.
- Standard monitor height ranges from 18 to 24 inches, requiring additional clearance in vertical setups.
Solution:
Measure your workspace and use adjustable monitor arms. Ensure your mount is VESA-compatible and offers adequate height adjustment.
Compatibility Issues with Software
Not all software applications are optimized for vertical displays. Programs designed for traditional horizontal screens may have interface problems or display content awkwardly on a vertical monitor.
Technical Details:
- Legacy software and older operating systems may not support vertical screen rotation (portrait mode) without third-party tools.
- Certain web-based applications may rely on fixed-width layouts, causing display truncation.
- GPU drivers (e.g., NVIDIA Control Panel, AMD Radeon Software) need to support portrait orientation for optimal performance.
Solution:
Ensure your software supports vertical orientation. Update software regularly and configure display orientation using GPU control panels. Use a secondary horizontal monitor for incompatible applications.
Refresh Rate Limitations
Vertical monitors may experience refresh rate limitations depending on the display interface and monitor capabilities.
Technical Details:
- HDMI 2.0 supports up to 144Hz at 1440p, while DisplayPort 1.4 supports up to 240Hz.
- Some vertical monitors may be capped at 60Hz in portrait mode due to hardware restrictions.
Solution:
Ensure your monitor and GPU support high refresh rates. Use DisplayPort for better bandwidth and verify refresh rate settings in your operating system and GPU control panel.
Color Calibration Issues
Color accuracy can shift when a monitor is rotated, especially with non-IPS panels.
Technical Details:
- Factory calibration may not account for portrait orientation.
- Vertical monitors may experience gamma shift or uneven brightness distribution.
Solution:
Calibrate your monitor using professional tools like X-Rite or DisplayCAL. Choose factory-calibrated models for better accuracy.
Multi-Monitor Alignment
Aligning multiple monitors, especially combining vertical and horizontal setups, can be challenging.
Technical Details:
- Different pixel densities (PPI) across monitors can cause inconsistent image scaling.
- Windows and macOS may struggle to maintain consistent alignment between displays.
Solution:
Use monitors with similar pixel densities for seamless transitions. Adjust alignment in the operating system's display settings. Consider using monitor arms for fine-tuned positioning.
Graphics Driver Optimization
Some graphics drivers may not properly handle vertical monitor configurations, leading to display issues.
Technical Details:
- Outdated drivers may lack support for portrait mode.
- Inconsistent multi-monitor setups can cause misalignment or performance drops.
Solution:
Regularly update GPU drivers via the manufacturer's website. Use GPU software to fine-tune settings and enable vertical orientation support.
Conclusion
A vertical monitor setup can significantly enhance productivity for specific tasks while optimizing your workspace. Remember that the ideal setup varies based on your specific needs - experiment with different configurations and stay tuned to Spacet's blog to find what works best for your workflow and comfort.
What's the best screen size for vertical orientation?
24-27 inches is generally ideal. Larger monitors may require excessive head movement, while smaller ones limit the benefits of vertical orientation.
Can any monitor be used vertically?
While most monitors can be used vertically, those with IPS or VA panels and built-in pivot features or VESA compatibility work best.
Is 27 inch too big for a vertical monitor?
A 27-inch vertical monitor is ideal for coding, writing, or reading long documents, but it may cause neck strain if not positioned properly. A 24-inch is more ergonomic and versatile.
Share: