


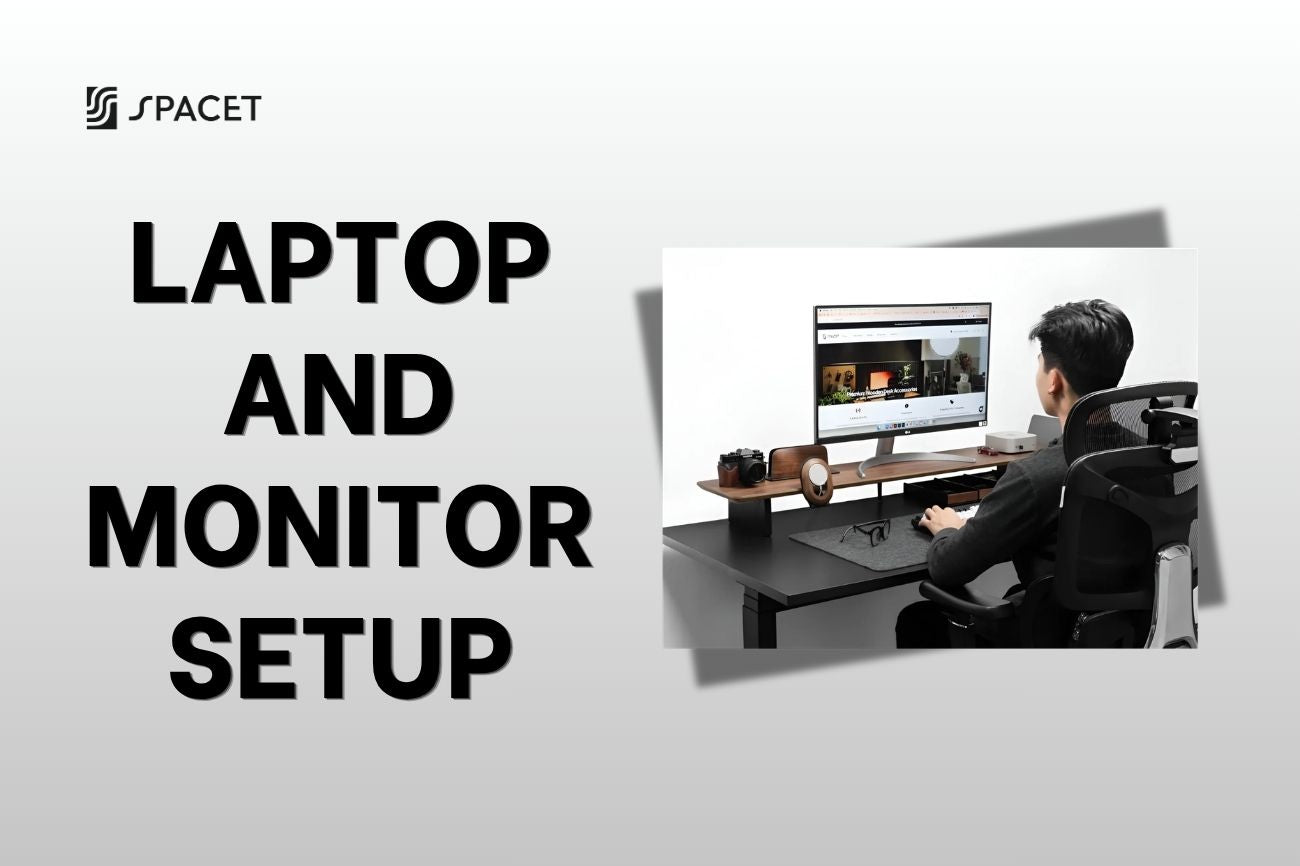
Staring at a small laptop screen for hours is one of those things that gets your neck started aching and your eyes feel like sandpaper. Adding an external monitor to your desk is one of the simplest upgrades you can make. Spacet walks you through everything you need to know about a proper laptop and monitor setup: how to connect your devices, how to position your screens, and how to organize your desk so it actually works for you.
Why pair a laptop with an external monitor?
Laptops are built for portability, not for sitting at a desk eight hours a day. The small screen and built-in keyboard push you into a head-down, shoulders-forward posture that quietly causes neck pain, back strain, and wrist discomfort over time. Adding an external monitor gives you room to sit up straight, look forward at eye level, and work the way your body actually wants to.

The productivity case is just as strong. A 15-year study by Jon Peddie Research found that people using multiple monitors see an average productivity increase of 42%. When everything you need is already on screen, you stop wasting time minimizing, maximizing, and hunting for the right window.
What to check before you connect anything
Before you reach for a cable, take thirty seconds to look at the ports on both your laptop and your monitor. This is the step most people skip, and then wonder why nothing works.
Common output ports on laptops:
- HDMI: the most widely available option, carries both video and audio, and works with the vast majority of modern monitors.
- DisplayPort / Mini DisplayPort: delivers higher image quality and refresh rates than HDMI, often found on gaming and creative laptops.
- USB-C / Thunderbolt: a single versatile port that handles video output, data transfer, and charging all at once, now standard on most slim laptops.
- VGA / DVI: older connections you rarely see on new laptops, but still usable if your monitor only has legacy inputs.

If the ports on your laptop and monitor don't match, a simple adapter or cable converter is all you need. A USB-C to HDMI adapter, for example, costs next to nothing and solves the problem instantly.
How to connect your laptop to a monitor
Once you know which ports you're working with, the actual connection is straightforward. Your laptop will usually recognize the external monitor on its own the moment you plug in.
On Windows:
Plug in the cable and press Windows + P to choose your display mode: Duplicate (same content on both screens), Extend (separate workspaces across both screens), or Second screen only (everything moves to the monitor). For everyday work, Extend is almost always the right choice since it gives you two independent screens to spread your work across.
On macOS (including MacBook):
Connect via USB-C, Thunderbolt, or HDMI depending on your model, then go to System Settings > Displays to configure. Leave Mirror Displays unchecked to extend your desktop, and drag the display boxes in the Arrangement tab to match how your screens are physically positioned on your desk.
Using a docking station:
If your laptop and monitor setup includes multiple peripherals like a keyboard, mouse, and headset, a docking station is worth the investment. One USB-C cable connects your laptop to the dock, and everything else flows through it. It keeps your desk clean and makes sitting down to work a one-cable experience.
How to position your laptop and monitor setup ergonomically
Getting the screens connected is only half the job. Where and how you place them determines whether your setup actually supports good posture or slowly wears you down.
Primary monitor placement
Position your main monitor directly in front of you, roughly arm's length away (about 50 to 70 cm). The top edge of the screen should sit at or just below eye level, so your gaze naturally falls to the upper portion of the display. Tilt the screen back 10 to 20 degrees to cut down on glare and keep your eyes comfortable throughout the day.

Where to put the laptop
If your laptop is acting as a secondary screen, place it beside your monitor at the same height so you're not constantly turning your neck to switch between the two. If you mainly work on the external monitor and only glance at the laptop occasionally, consider raising the laptop with a riser so both screens sit at a similar eye level. Looking down at a low laptop screen for hours adds up quickly, and your neck will feel it.
External keyboard and mouse
Once your laptop is elevated, you'll need an external keyboard and mouse to type comfortably. Set your keyboard so your elbows sit at roughly 90 degrees and your wrists stay relaxed and flat. Keep the mouse close to the keyboard to avoid reaching. Wireless options help keep the desk tidy and reduce cable clutter around your hands.
Dual monitor positioning
If you're running two separate monitors in your laptop and monitor setup, place them side by side and angle each one slightly toward you, about 10 to 20 degrees inward. If you use one screen far more than the other, center your primary monitor in front of you and angle the secondary one to the side. Avoid spreading them too far apart since constantly rotating your head between two distant screens puts just as much strain on your neck as looking down.
Choosing the right monitor for your setup
If you're planning to add a monitor to your desk, here are the practical specs worth paying attention to:
- Size: 24 to 27 inches fits most standard desks comfortably; 32 inches and above works better with a deeper desk and more distance between you and the screen.
- Resolution: 1080p is fine for general office work; step up to 2K or 4K if you work with photos, video, or simply want more content visible on screen at once.
- Connectivity: look for HDMI and DisplayPort as a baseline, or USB-C if your laptop supports it; a built-in USB hub is a bonus if you have a lot of peripherals to manage.
- Adjustability: a monitor that lets you change the height, tilt, and rotation makes dialing in an ergonomic position far easier than one that only tilts.
How to organize your desk for a laptop and monitor setup
More screens mean more gear: extra cables, a docking station, maybe a laptop riser. Without a bit of structure, the desk gets cluttered fast, and clutter has a way of making it harder to focus even when you don't consciously notice it.
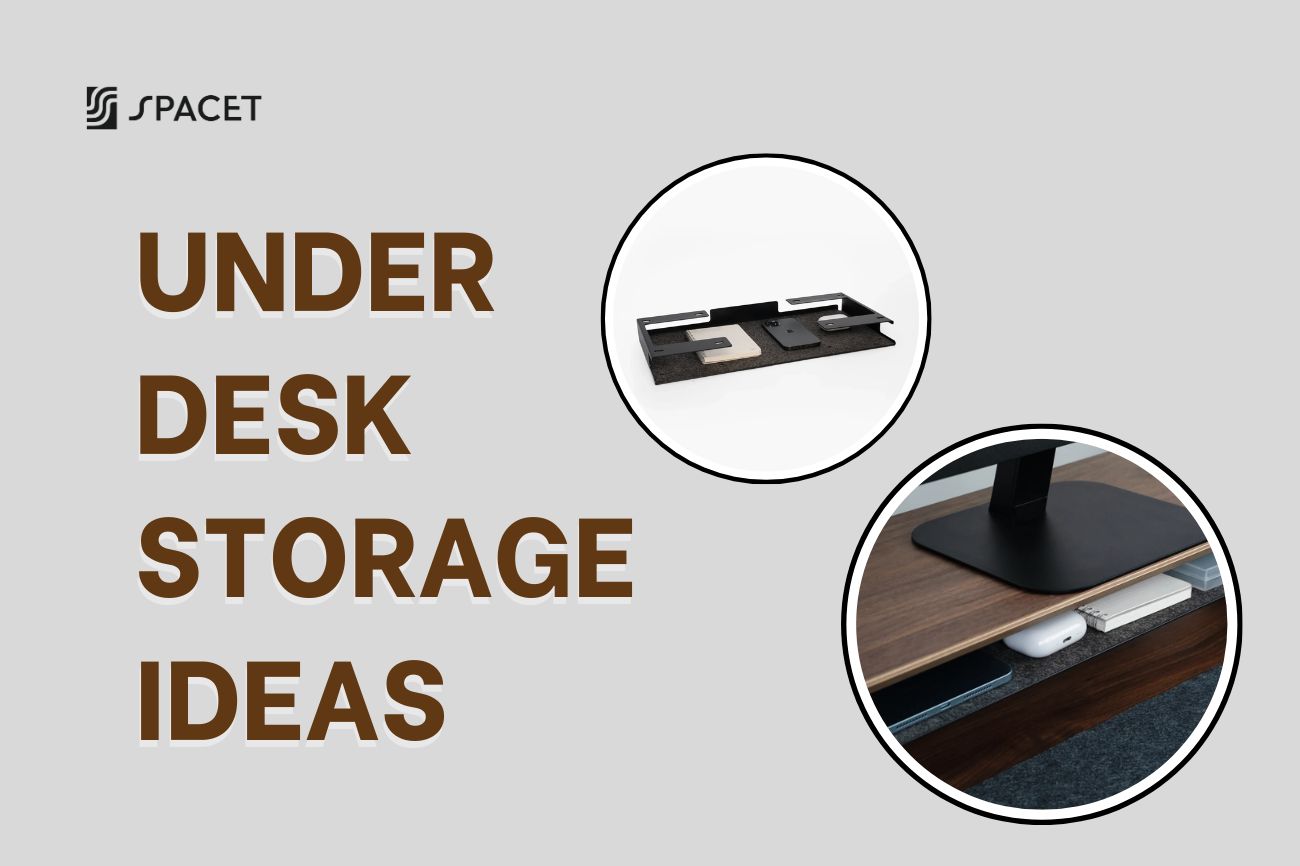
Use a desk shelf to work vertically
Instead of spreading everything flat across your desk surface, a desk shelf lets you build upward and reclaim valuable space in front of you.
The Desk Shelf Pro v2.0 from Spacet is a solid option if you want something both functional and good-looking. It combines hardwood plywood, an aluminum frame, and a cork surface, with an integrated lower shelf underneath for your keyboard, mouse, or cables. Your monitor sits on top, your peripherals tuck below, and the whole desk suddenly feels a lot more intentional.

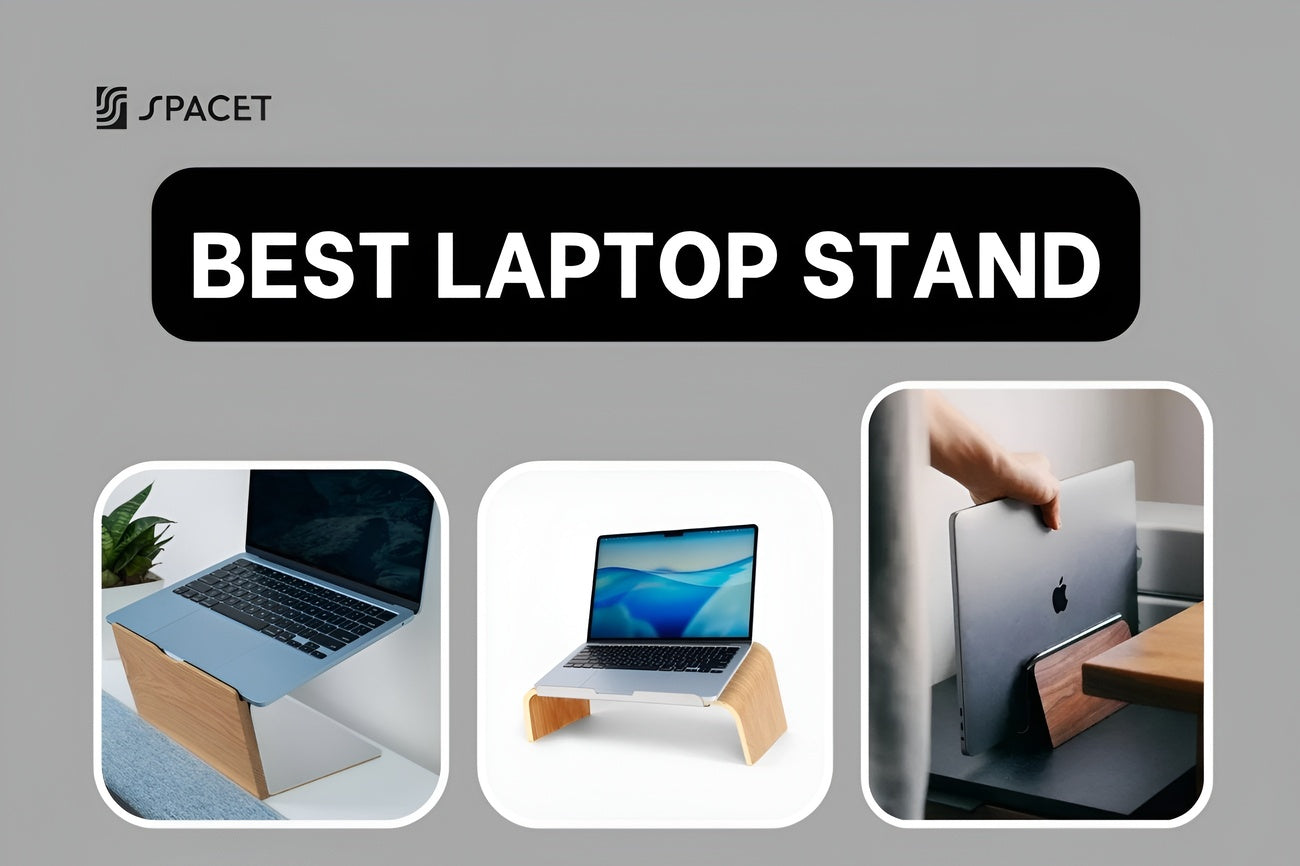
AIRY Modular Desk Shelf: built to flex with your laptop and monitor setup
If you want more control over how your setup is organized, the AIRY Modular Desk Shelf is worth a closer look. AIRY runs on a mounting grid system that lets you attach add-ons wherever they make sense, which makes it especially well-suited for a laptop and monitor setup where you need things positioned just right.

Two add-ons that work particularly well here:
- Laptop Riser - The Modular: clips directly onto the AIRY Shelf and lifts your laptop to eye level while keeping airflow moving underneath. It holds laptops up to 2 cm thin and locks securely into the mounting grid.
- Laptop Dock - The Modular: holds your laptop upright and out of the way when you're working primarily on an external monitor. It mounts onto the AIRY Shelf and keeps your laptop stable, ventilated, and easy to plug into.
Pairing the AIRY Shelf with either the Laptop Riser or the Laptop Dock gives you a clean, ergonomic laptop and monitor setup without taking up any extra footprint on your desk surface.

>> Explore more details in our Desk Shelf System collection.
Keep cables under control
Cable clutter is one of the most common problems with multi-device setups, and one of the easiest to fix. Use velcro cable ties to bundle cables into groups, and clips to route them along the back edge of your desk. A docking station helps the most here since it reduces everything to a single cable running from the dock to your laptop, with all other connections managed behind the scenes. Many desk shelves also come with cable routing holes built in so wires stay hidden and out of sight.
Get your lighting right
Place your desk lamp to the side of or slightly behind your monitor, never directly in front of or behind you. Natural light is great, but windows directly behind or in front of your screen create glare that strains your eyes without you always realizing it. Light coming in from the side is the most comfortable setup for long work sessions.
Display mode options and when to use each
| Mode | When to use it |
| Extend | Everyday work with multiple apps open at once |
| Duplicate | Presentations, demos, or sharing your screen with someone nearby |
| Second screen only | Working primarily on your monitor with the laptop closed |
| Mirror (macOS) | Connecting to a TV, projector, or external display for presentations |
Tips for optimizing your laptop and monitor setup by work type
Your ideal configuration depends a little on what you actually do all day:
- Office and remote workers: use Extend mode and dedicate your secondary screen to email and calendar; invest in a docking station so sitting down to work is a single-cable routine.
- Designers and content creators: choose an IPS monitor with wide color coverage (sRGB 100% or above); use the larger monitor as your main workspace and the laptop as a reference screen or tool palette.
- Developers: try rotating your monitor to portrait mode for code and keeping the laptop in landscape for a terminal or browser, giving you far more lines of code visible without scrolling.
- Students: you don't need a high-end monitor to benefit from a dual-screen setup; a mid-range 24-inch display is plenty, and investing in proper screen positioning will make a bigger difference than specs.
FAQs about laptop and monitor setup
How many external monitors can a laptop support?
It depends on your laptop's graphics card and the number of video output ports it has. Most standard laptops support one external monitor via HDMI or USB-C. For two monitors or more, you'll need a laptop with two independent video outputs or a docking station that supports dual or triple display.
Can I raise my laptop to eye level without an external monitor?
Yes, but you'll need an external keyboard and mouse to go with it. Once the laptop is at the right height, the built-in keyboard sits too high to type comfortably, so external peripherals become essential rather than optional.
Where should the laptop go in a laptop and monitor setup?
If the external monitor is your primary screen, the most common approach is to either dock the laptop upright to the side or place it next to the monitor at the same height. If you use both screens equally, position them side by side and angle them slightly toward you.
Can USB-C output video to a monitor?
Yes, but only if the port supports DisplayPort Alternate Mode or Thunderbolt. If it does, a USB-C to HDMI or USB-C to DisplayPort cable is all you need to connect your monitor.
Why isn't my laptop detecting the monitor after plugging in?
Work through it step by step: check that the cable is fully seated, confirm the monitor is on the correct input source, then use Detect Displays in Windows Display Settings or hold Option and click Detect Displays in macOS System Preferences. If it still doesn't work, try a different cable or port and make sure your graphics drivers are up to date.
A proper laptop and monitor setup is one of those changes that sounds simple and turns out to make a bigger difference than you expected. Get the connection right, position your screens at the right height, and give your desk some structure, and you'll notice it in how you feel at the end of the day. If you're looking for a clean way to organize everything, visit the Spacet Blog for more guides on building a desk setup that actually works for you.
Share: